If you are a fan of artificial intelligence and generative art, you might have heard of Midjourney. It is a website that allows you to create stunning images using a powerful deep-learning model. You can explore different themes, styles, and concepts by simply entering a text prompt and letting the AI do the magic.
However, there is one drawback of Midjourney that you might have noticed. The images that it generates are limited to a resolution of 1024×1024 pixels. This means that if you want to use them for larger displays or prints, they might look pixelated or blurry. So, you might want to enhance the image quality and detail to make them more realistic and appealing.
Then, here comes the question: how can you upscale Midjourney images for higher quality and resolution? In this blog post, we will show you how to do that using different methods and tools that are AI-powered too. We will explain the benefits of upscaling Midjourney images, the steps to use various tools and services for upscaling images, and some tips and tricks to optimize the results. By the end of this blog post, you will be able to create amazing upscaled Midjourney images that will impress your friends and followers. You won’t believe how amazing your Midjourney images can look after upscaling them.
What is Upscaling
Upscaling is a technique of increasing the number of pixels in an image, making it larger and more detailed. Pixels are the tiniest dots that make up an image on a screen or a print. Generally, if an image has more pixels, it comes with a higher resolution and better quality. However, not all images have enough pixels to display or print well in large sizes or formats. This is especially true for Midjourney images with a max resolution of 1024*1024.
Upscaling uses AI algorithms to analyze the original image and fill in the missing information by adding new pixels. The AI learns from a large database of high-resolution images and tries to mimic their patterns and textures. For example, if the original image has a blurry tree in the background, the AI will try to add more pixels that resemble the leaves, branches, and bark of a real tree. The result is an upscaled image that has more details and clarity than the original one.
There are different types of upscaling algorithms that use different approaches and techniques to enhance images. Here is a table that summarizes the strengths and weaknesses of the three algorithms:
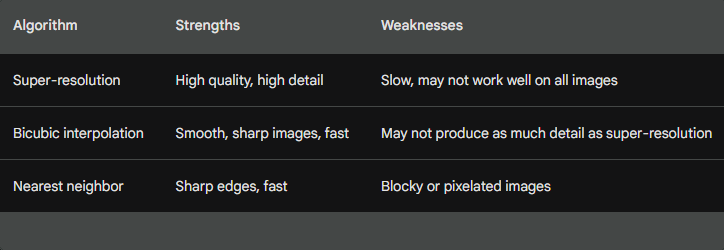
Super-resolution: the most advanced upscaling algorithm, but also the most computationally expensive. This is a type of upscaling that uses deep learning to create high-resolution images from low-resolution ones. Super-resolution algorithms use neural networks to learn how to reconstruct images with more pixels and details.
Bicubic interpolation: a good compromise between quality and speed. This type of upscaling uses mathematical formulas to calculate the values of new pixels based on the values of existing ones. Bicubic interpolation algorithms use cubic functions to smooth out the edges and curves of images and avoid jaggedness or blurriness. However, it may not be able to produce as much detail as super-resolution.
Nearest neighbor: the simplest and fastest upscaling algorithm. Nearest neighbor algorithms simply copy the value of the closest pixel to fill in the new pixels. This results in images that have sharp edges but also look blocky or pixelated.
How Does It Work?
There are many reasons why you might want to upscale Midjourney images. There are several reasons that are beneficial for you, such as: improving the image quality and detail, making the images suitable for larger displays or prints, or enhancing the creativity and realism of the images.
To me, it’s simple because it does work. Here’s a Midjourney image that we created using the text prompt “a man playing volleyball”:

As you can see, these images are quite impressive and creative, but they are also low in resolution and quality. Now, let’s see how they look after upscaling them using one of the tools that we will introduce later:
You click the image to enlarge and, as you can see, these images are much more detailed, clear, and realistic after upscaling. They also have a higher resolution and size that make them suitable for larger displays or prints. Don’t they look amazing?
Upscale Your Midjourney Images in Minutes with These Awesome Tools
Now that you know why upscaling Midjourney images is a good idea, let’s see how you can do it. Unfortunately, Midjourney does not have a built-in upscaler for its latest V5 model, which means that you cannot increase the resolution or quality of your images within the website itself.
Therefore, if you want to upscale your Midjourney images, you will need to use a third-party tool or service that can do that for you.
In this blog post, we will introduce five popular and effective tools or services, all AI powered, for upscaling images that you can use for your Midjourney images. Give them a try and pick one that better suits your needs.
Topaz Gigapixel AI
Topaz Gigapixel AI is a desktop software that uses artificial intelligence to upscale your images up to 6x without losing quality. It can also enhance the photo quality by suppressing noises, removing blur, and fixing compressing. Topaz is believed to be one of the most advanced and powerful tools for upscaling images that you can find.
First thing first, download and install Gigapixel AI to your computer. You can use it on both Windows and macOS users to upscale your Midjourney images.
Once you have installed the software, you can launch it and drag and drop your Midjourney image into the interface.
With the side-by-side view, you will see a preview of your original image on the left side and a preview of the upscaled image on the right side. Besides side-by-side, you have the single, split, and comparison view and you can zoom in and out to compare the difference.
On the right panel, you need to set the scale, which is the desired output size for your image. Simply choose a scale factor from 0.5x to 6x. You are able to enter a custom size, but it is NOT quite recommended.
Now, you need to choose the AI model, which determines how AI will enhance your images. If you are NOT sure which one to pick, simply use the Auto function and let the program recommend one for you. Or, move your mouse over those models to see the official explanation of what they are and what they can do. The simplest way is to enable the Comparison view, and in this way, you will how each AI model works for your image.
Below AI models, you will see settings and additional settings to adjust the noise reduction and face refinement of your image. These options can help you remove noise and artifacts from your image and improve the facial features and expressions of any people in your image. Turn them on when needed.
At the bottom of the right panel comes the Save Image button. Click it when you are satisfied with the preview and here you can choose the file format, name, color profile, location, etc for your upscaled image.
Topaz Photo AI
Topaz Photo AI is also from Topaz Labs. The difference between Photo AI and Gigapixel AI is that Photo AI does more but costs more. Besides upscaling, it does AI sharpening and noise reduction.
To use Topaz Photo AI to upscale your Midjourney images, you need to:
Download and install Topaz Photo AI on your computer or laptop from Topaz Labs’ website.
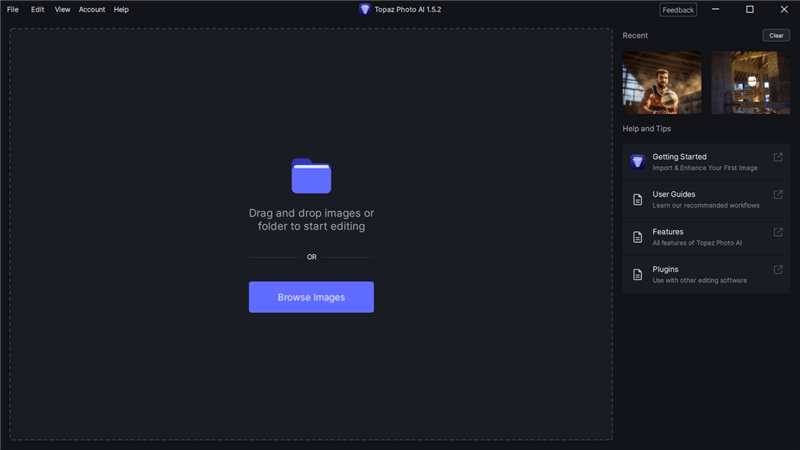
Open Topaz Photo AI and add your images by drag-and-drop. Or, click on “Browse Images” to select your photos.
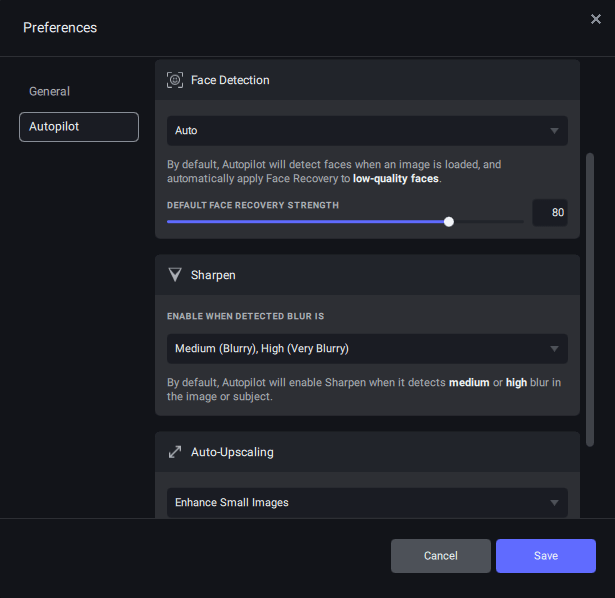
Choose the functions you want to use from the four options: Upscale, Remove Noise, Sharpen, Recover Faces, or Preserve Text. Each mode has a different purpose and effect on your image. Topaz Photo AI has autopilot on and it automatically detects the problems your image has and applies the best model for you. However, since this post is about upscaling, go for it.
In the Upscale mode, you need to choose an AI Model and adjust the settings and parameters according to your preferences and needs. You can use the sliders or enter the number to change the values of each setting for denoising, deblurring, and compression.
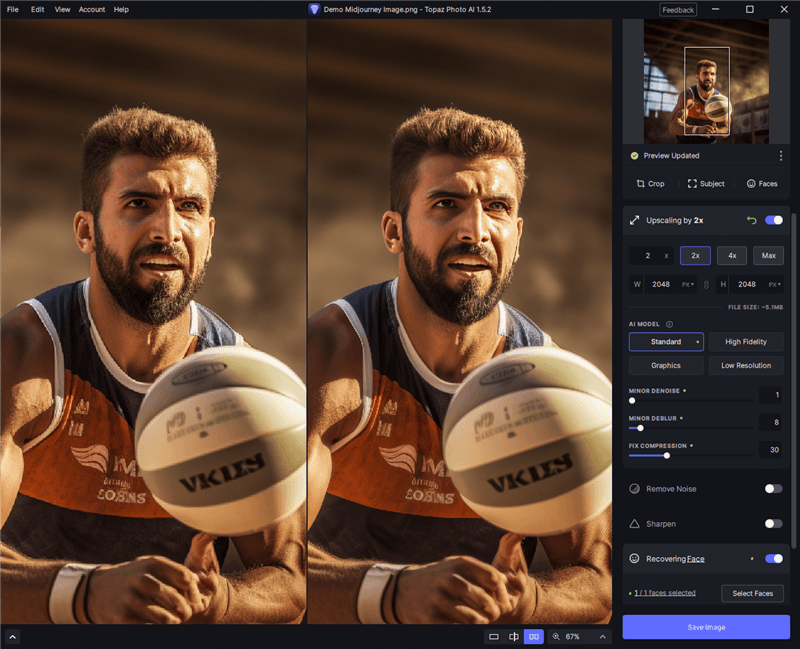
Preview the results of each mode on your image. You can use the split view or the side-by-side view to compare the original and the processed image and zoom in using your mouse’s middle key to see the differences more clearly.
Click “Save Image” to export. Here, you can choose the file name, format, quality, and location of your image.

Since Photo AI is more powerful, you may also use it for sharpening your images. But I don’t think it is useful for Face Recovery and Denoise. From what I can see, the Midjourney images don’t have such problems but it did enable Face Recovery for my demo image.
Bigjpg [Online, macOS, Windows, Android, iOS]
Bigjpg mainly works online to upscale your images up to 4x without losing quality, but it works on Windows, macOS, iOS and Android too. Besides, it can enhance the sharpness, detail, and color of your images. It is one of the most simple and easy-to-use tools for upscaling images that you can find. I will take the online version as an example.
To use Bigjpg to upscale your Midjourney images, you will need to visit the website and upload your Midjourney image. You can either drag and drop your image or click on Select Image to choose one from your local hard drive.
Click Start and you will see some options below to choose the desired output size and quality settings for your image. 2x, 4x, 8x and 16x are available.
In settings, you will see a menu that allows you to choose the style for your image. The style determines how the algorithm will process your image and generate new pixels. There are two styles available: artwork and photo. You can choose the one that best suits your image style. For example, if your Midjourney image is artistic or cartoon-like, you can choose the art style. If your Midjourney image is realistic or photographic, you can choose the photo style.

After choosing the output size, quality, and style for your image, you can click on OK at the bottom right corner to begin the upscaling process.
When the upscaling process is finished, you can download your upscaled image by clicking on Download. However, please note the shown download size is NOT accurate.

Waifu2x [Online]
Waifu2x is an online service that uses the open-source project on Github to upscale your images up to 2x without losing quality. It can also enhance the sharpness, detail, and color of your images. It is one of the most popular and widely-used tools for upscaling images, especially anime or manga-style images.
To use Waifu2x to upscale your Midjourney images, you will need to visit one of the online versions of Waifu2x. There are many versions available, but we recommend using the below one as it is actually the official one.
On the website, you can upload your Midjourney image by adding the image URL or clicking on Choose File button to add a local file. However, you are only able to upload one image at a time.

As shown above, you have some options to choose the image style, output format, noise reduction level, and desired output size. You can choose a scale factor from 1.6x to 2x. Please note the 4x upscaling is only available in the in-browser version of waifu2x. It is still experimental.
About the noise level for your image, it determines how much noise and artifacts will be removed from your image. There are five noise levels available: none, low, medium, high, and highest. Please choose one that best suits your image quality so as to get better output quality. For example, if your Midjourney image is noisy or has artifacts, you can choose a high noise level. If your Midjourney image is clean or has few artifacts, you can choose a low noise level.
The upscaling is relatively very fast and I am able to download the image right after I verify all images from reCAPCHA. This may be because Waifu2x has a size limitation for uploading and upscaling.
Conclusion
In this blog post, we have shown you how to upscale Midjourney images for higher quality and resolution using different methods and tools. Hopefully, they are useful and informative for you. We encourage you to try out different methods and tools for upscaling images and see how they can improve your Midjourney images.
If you have any feedback or experiences with upscaling Midjourney images, we would love to hear from you. Please feel free to leave a comment below or contact us via email or social media. We appreciate your input and support.
Thank you for reading this blog post and we hope you enjoy creating amazing upscaled Midjourney images. If you want to learn more about Midjourney and other related topics, please check out our other blog posts. Have a great day!